作者归档:admin

免费磁盘数据恢复软件 Recuva 推荐

CF卡,不小心误删了视频和照片,还覆盖了几G,找了好多个软件,N多的软件说免费,但是最后恢复基本上都要钱冲会员或者购买软件,扫描还那么慢,试了都找不到文件。还有一些免费的不好用,

试了N多个,最后发现还是Recuva好用,力荐,扫码超快,直接恢复,个人使用还免费不要钱。支持U盘,机械硬盘,固态硬盘等等。

好东西要分享,   下载,rcsetup153


Cisco anyconnect 服务器搭建(服务器软件采用ocserv)注意本项目是基于Centos7操作系统

Cisco anyconnect 服务器搭建(服务器软件采用ocserv)注意本项目是基于Centos7操作系统

安装步骤

安装ocserv 服务器,请使用下面的脚本文件进行安装
https://raw.githubusercontent.com/chendong12/ocserv/master/ocserv_quick.sh

;

使用Radius来管理ocserv 服务器中的账号,即OCSERV对接Radius,请使用下面的脚本文件进行安装
https://github.com/chendong12/ocserv/blob/master/ocserv_radius_quickinstall.sh

;

服务器操作常用方法

  • 启动服务器方法: systemctl start ocserv
  • 停止服务器方法: systemctl stop ocserv
  • 重启服务器方法: systemctl restart ocserv

增加客户端账号的方法

  • /root/anyconnect/user_add.sh 通过脚本文件直接增加账号密码和证书文件
  • ocpasswd -c /etc/ocserv/ocpasswd user_name 增加用户名为user_name的账号,如果已经存在则修改其密码
  • cd /root/anyconnect ; mkdir user_name ; cd user_name ; ../gen-client-cert.sh user_name /root/anyconnect 只增加用户证书
  • ocpasswd -d user_name 删除user_name账号

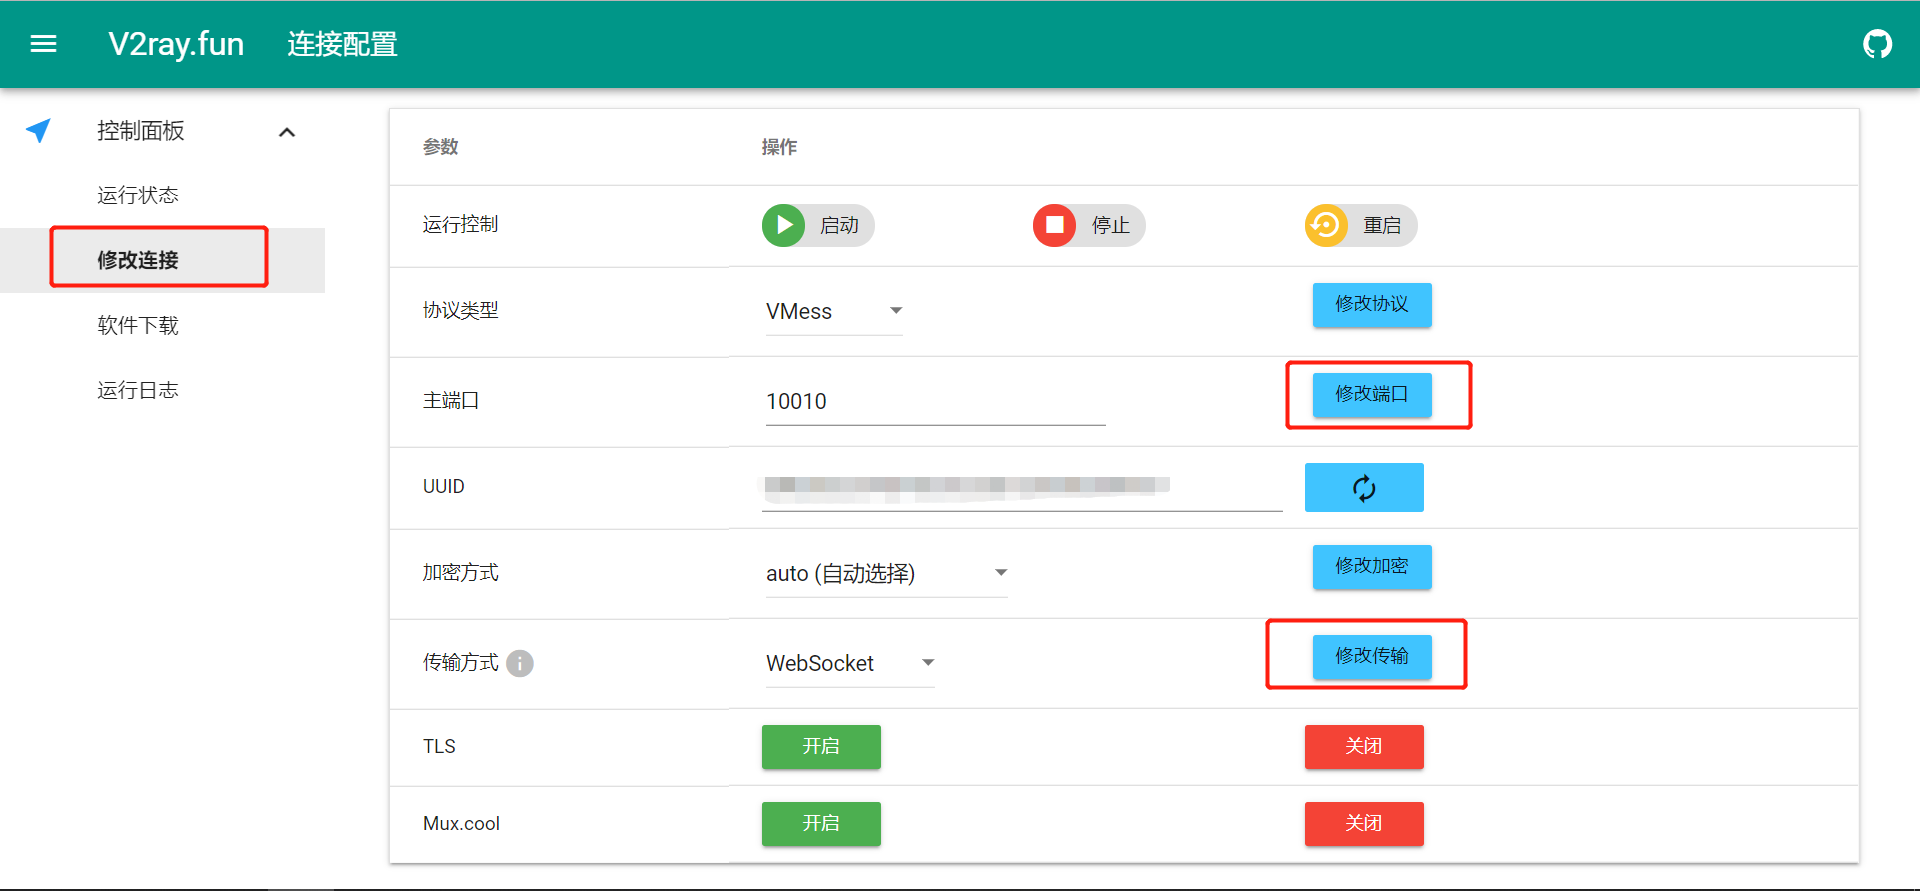
配置 v2ray + WebSocket + TLS

安装配置 v2ray

v2ray 的安装很简单,安装脚本来自 fhs-install-v2ray,如要移除,请参考 README

// 安裝執行檔和 .dat 資料檔
# bash <(curl -L https://raw.githubusercontent.com/v2fly/fhs-install-v2ray/master/install-release.sh)
Bash

安装好之后我们可以用 systemctl start v2ray 和 systemctl stop v2ray 来开启和关闭 v2ray

该脚本安装的 v2ray 的配置文件路径是 /usr/local/etc/v2ray/config.json,如果忘记了可以用 systemctl status v2ray 来查看。下面我们编写配置文件

{
  "inbounds": [
    {
      "port": 10000, # 该端口需要与后面 nginx 配置的端口一致
      "listen":"127.0.0.1", # 只监听 127.0.0.1,避免除本机外的机器探测到开放了 10000 端口
      "protocol": "vmess",
      "settings": {
        "clients": [
          {
            "id": "b831381d-6324-4d53-ad4f-8cda48b30811", # 此处填写生成的 uuid
            "alterId": 64
          }
        ]
      },
      "streamSettings": {
        "network": "ws",
        "wsSettings": {
        "path": "/ray"
        }
      }
    }
  ],
  "outbounds": [
    {
      "protocol": "freedom",
      "settings": {}
    }
  ]
}
Bash

直接赋值这个内容粘贴到 v2ray 的配置文件中即可,只有两个地方时要修改的,一个的端口(也可以不修改),一个是 idid 的生成可以到 https://www.uuidgenerator.net

证书的生成和自动续签

TLS 是需要证书的,这里我们使用 certbot 来帮我们申请免费的 Let's Encrypt 证书,Let's Encrypt 是一家免费,开放,自动化的证书颁发机构,官方文档参考 Let’s Encrypt 快速入门Let's Encrypt 官方建议使用 certbot 来进行证书的获取。安装 certbot 需要先安装 epel 仓库,命令如下:

$ sudo yum install epel-release

$ sudo yum install certbot
Bash

由于我们的 VPS 上并没有一个真实运行的网站(只是用来进行流量的伪装),所以我们需要用 certbot 的 standalone 参数来运行一个独立的网页服务器进行身份验证(certbot 需要确定你拥有域名指向的服务器的所有权),该网页服务器会使用 VPS 的 80 端口,所以你需要关闭 VPS 上的 web 服务器(比如 nginx)。申请证书的命令如下

# 添加免费SSL证书,example.com改为你购买的域名
certbot certonly --standalone -d example.com # 生成证书的时候会让你填一个邮箱,在证书快到期的时候会发邮件给你

# 安装成功后的证书路径
/etc/letsencrypt/live/example.com/fullchain.pem
/etc/letsencrypt/live/example.com/privkey.pem

# 查看已经生成的证书
certbot certificates
Bash

这里注意,如果出现红字说生成失败,那么要检查一下域名解析填的 IP 是否正确,也可以在 VPS 中 ping 一下你的域名看看能不能 ping 通,并且指向的 IP 是不是当前 VPS 的 IP

vps-2021-certbot

如果你的域名解析正确并且能够在 VPS 上 ping 通,但是还是一直红字提示失败,那么你需要检查一下 VPS 的防火墙,可以用 systemctl status firewalld 来查看是否开启了防火墙。一般来说出现这种情况都是因为防火墙的开启,比较简单的解决方法就是关闭防火墙:

systemctl stop firewalld
systemctl disable firewalld
Bash

如果你不想关闭防火墙可以试一试让防火墙开放指定端口(我是直接关闭防火墙的,该方法没有实际测试),以下命令均来自 Linux CentOS7 开启80,443端口外网访问权限

# 检查防火墙状态
firewall-cmd --state # running 表示启动 not running 表示未启动

# 开启端口外网访问 返回 success 表示开启成功 --permanent 表示永久生效,不加该参数则重启后失效
firewall-cmd --zone=public --add-port=80/tcp --permanent
firewall-cmd --zone=public --add-port=443/tcp --permanent

# 开放多个端口
firewall-cmd --zone=public --add-port=80-85/tcp --permanent

# 关闭端口 返回 success 代表成功
firewall-cmd --zone=public --remove-port=80/tcp --permanent

# 重新载入 返回 success 代表成功
firewall-cmd --reload

# 查看端口是否成功开启 返回 yes 代表开启成功
firewall-cmd --zone=public --query-port=80/tcp
Bash

Let's Encrypt 的证书是免费的,但是每次证书的有效期只有 90 天,也就是我们至少在 90 天以内更新一次我们的证书,你可以到 VPS 上手动更新,命令时 certbot renew,还是要注意更新证书的时候需要关闭 nginx,否则会报 80 端口被占用。你用可以先用 certbot renew --dry-run 来检验是否能够成功更新,该命令只是检测,不会真的生成证书。

还有一个需要注意的点就是默认情况下只有证书有效期小于 30 天的时候才能进行更新,如果有效期超过 30 天则会更新失败。

如果每次手动更新太麻烦了,我们可以使用 crond 帮我们定期执行更新命令,首先进行安装并启动(vultr 的 VPS 默认已经安装了)

yum -y install vixie-cron
yum -y install crontabs
service crond start
Bash

crontab 可以用 cron 表达式帮我们定期执行一些命令,输入 crontab -e 就可以输入我们要定期执行的表达式了:

1 0 15 * * /usr/bin/certbot renew --pre-hook "systemctl stop nginx" --post-hook "systemctl start nginx"
Bash

表达式的前五个 * 或者数字是 cron 表达式,分别代表 分 时 日 月 年* 就代表  的意思,比如上面的 1 0 15 * * 表示每年每月的 15 号的 00 : 01 执行后面的命令。--pre-hook 和 --post-hook 则是 certbot 的两个参数表示在执行 renew 之前和之后的两个命令钩子,此处表示我们先关闭 nginx 在执行 renewrenew 完成后再启动 nginx

安装配置 nginx

配置了 TLS 需要一个 web 服务器,这里可以选择 nginxapache 或者 caddy,我使用的是 nginx

# 安装 nginx
yum -y install nginx

# 设置nginx的开机启动
systemctl enable nginx
Bash

nginx 的配置文件默认是 /etc/nginx/nginx.conf,不过我建议是在 /etc/nginx/conf.d 中创建一个独立的配置文件 v2ray.conf,方便管理。nginx.conf 会读取 conf.d 中的所有 conf 文件。创建好配置文件后写入如下配置

server {
  listen 443 ssl;
  listen [::]:443 ssl;

  ssl_certificate       /etc/letsencrypt/live/example.com/fullchain.pem; # 此处的路径写你生成的证书路径
  ssl_certificate_key   /etc/letsencrypt/live/example.com/privkey.pem; # 此处的路径写你生成的证书路径
  ssl_session_timeout 1d;
  ssl_session_cache shared:MozSSL:10m;
  ssl_session_tickets off;

  ssl_protocols         TLSv1.1 TLSv1.2 TLSv1.3;
  ssl_ciphers           ECDHE-ECDSA-AES128-GCM-SHA256:ECDHE-RSA-AES128-GCM-SHA256:ECDHE-ECDSA-AES256-GCM-SHA384:ECDHE-RSA-AES256-GCM-SHA384:ECDHE-ECDSA-CHACHA20-POLY1305:ECDHE-RSA-CHACHA20-POLY1305:DHE-RSA-AES128-GCM-SHA256:DHE-RSA-AES256-GCM-SHA384;
  ssl_prefer_server_ciphers off;

  server_name           your.domain; # 你的域名
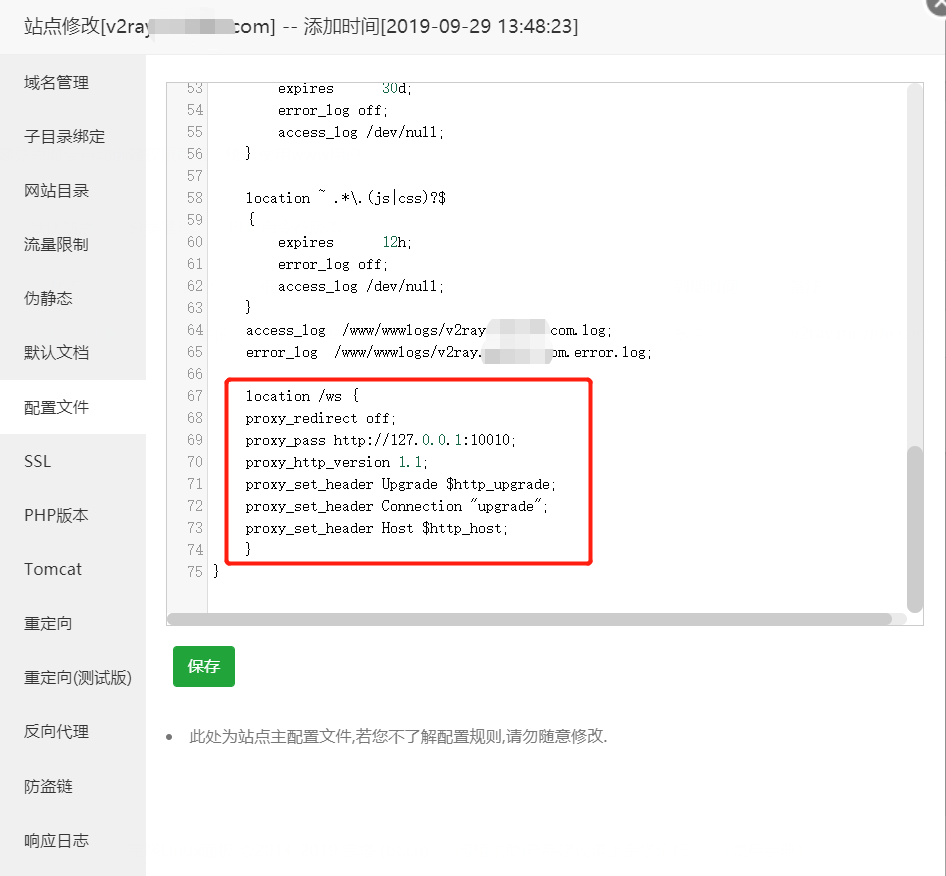
    location /ray { # 与 V2Ray 配置中的 path 保持一致
      if ($http_upgrade != "websocket") { # WebSocket协商失败时返回404
          return 404;
      }
      proxy_redirect off;
      proxy_pass http://127.0.0.1:14400; # 这里的端口写你在 v2ray 中配置的端口
      proxy_http_version 1.1;
      proxy_set_header Upgrade $http_upgrade;
      proxy_set_header Connection "upgrade";
      proxy_set_header Host $host;
      # Show real IP in v2ray access.log
      proxy_set_header X-Real-IP $remote_addr;
      proxy_set_header X-Forwarded-For $proxy_add_x_forwarded_for;
    }
}
Bash

需要修改的地方我已经在注释中表名,请仔细修改,注意分号。编写完成后我们用 nginx -t 来测试配置文件是否有语法错误,一般如果显示如下命令则表示语法没问题,我们可以重启 nginx

nginx: the configuration file /opt/homebrew/etc/nginx/nginx.conf syntax is ok
nginx: configuration file /opt/homebrew/etc/nginx/nginx.conf test is successful

systemctl restart nginx
Bash

caddy 是一个比较新的用 golang 实现的 web 服务器,我不是很熟悉,不过它可以自动签发 https 证书,这一点来说比较方便,如果你不想自己配置证书可以使用 caddycaddy 的配置参考 新 V2Ray 白话文指南

SELinux

上面的步骤都执行完了,一般来说我们的配置就已经完成了,此时在客户端上正确配置就能够访问 Google 了。如果此时你的 v2ray 客户端显示服务器连接正常,但是你还是不能访问 Google,很可能是 SELinux 的问题,此时我们只要去 /var/log/nginx/ 查看 access.log 可以看到很多的 Permission Denied,说明 VPS 收到了我们的请求但是由于 SELinux 无法转发给 v2ray,此时我们可以关闭 SELinux,也可以直接执行 setsebool -P httpd_can_network_connect 1 来开启内网转发的权限。

关于 SELinux 的介绍可以参考 阿里云

clash

我原来在 Mac 上一直用的是 V2rayU 作为客户端的图形界面代理工具,这个工具一直都用的挺好。最近看了看 clash 相关的图形界面代理工具,包括 Clash for WindowsClashX 和 ClashX Pro,其中 ClashX 是开源的,其他都是闭源的,clash 有个 premium-core 也是闭源的。我当时就是觉得界面比较好看所以试了试 ClashX Pro,不过使用后遇到了不少问题,首先是没有文档,全部靠 clash 自身的文档,ClashX 的 Github 仓库也不能提 issueClashX Pro 更是仓库都没有,只是在微软的 App Center 里面有下载和 release note,遇到问题只能到 Github 仓库中提一个 discussion 里面提一个,大概率没人管。

ClashX Pro 支持 clash premium-core,主要是支持一个 tun mode,可以代理电脑中所有的 tcp 和 udp 流量。这个我使用需求不大,需要代理的软件单独设置就可以。另一个功能就是支持一个 rule provider 功能,这个比较有用,之前用 V2rayU 的时候有 pac 模式,有一个默认的 GFW list ,基本上我们配置完 vmess 就可以使用了。在 clash 这里基本每个规则都得自己配置,rule provider 让我们可以用一些别人配置好的 rule-set,这样就比较方便,有些 rule-set 是可以自己更新的(SS-Rule-Snippet 和 clash rules 是两个比较好的 rule 配置)。但是在使用 ClashX Pro 的时候还遇到两个比较严重的问题,一个就是切换有线和无限会由于 fake id 的原因无法上网,还有就是内存占用非常高,刚开就 180m 的内存占用,后面还会一直增加,不知道为什么一个代理工具这么高的内存你占用。使用 ClashX 则相对较低只有几十兆,V2rayU 只有十几兆。目前我使用的是 ClashX ,比较麻烦的就是 rule,得自己手填一堆。M1 芯片的电脑还有个方法就是安装手机上用的 shadowrocket,必须用美服 apple id 才能下载。

最后就是配置终端代理,原来我都是用 curl cip.cc 进行测试,其实这个测试结果完全就是看你 curl 这个地址是否走了代理,如果在代理工具中配置了这个地址直连,那么得到的结果肯定还是真实的 IP 而不是代理服务器 IP,可以参考 请问clashx怎么设置终端代理呢? 这个 issue,用 curl -vv https://www.google.com 来进行测试。

总结

这个新版本的 v2ray 的配置总结了我最近配置时候遇到的一些问题,按照这一套走下来应该是没有什么问题,如果你还有其他疑问,欢迎评论或者给我邮件。

Nextcloud使用OCC命令重置密码

OCC命令的用法
occ命令是ownCloud/Nextcloud的命令行界面。您可以使用occ执行许多常见的服务器操作,例如安装和升级ownCloud/Nextcloud,管理用户,加密,密码,LDAP设置等。

一般格式是这样的:

sudo -u www-data php occ [options] [arguments]


重置密码

user相关命令:

 user
  user:add                            添加一个用户
  user:delete                         删除特定用户
  user:disable                        禁用特定用户
  user:enable                         激活特定用户
  user:info                           显示用户信息
  user:lastseen                       显示用户最后登陆了时间
  user:list                           列出所有用户
  user:report                         显示有多少用户访问
  user:resetpassword                  为一个用户重置密码
  user:setting                        读取和修改用户设置

我们需要用的是user:reserpassword。

命令格式为为下

sudo -u www-data php occ user:resetpassword 用户名

实例

要重置密码之前,我们要先知道要给哪个用户重置密码。

sudo -u www-data php occ user:list

重置用户admin的密码

sudo -u www-data php occ user:resetpassword admin

然后会提示输入新密码(输入的密码不会显示)按回车确认密码。

如果输入的密码比较简单,你会得到以下提示,那么你需要换一个更复杂的密码。

重置成功:

Nextcloud/ownCloud去除URL中的index.php详解[转载收藏]

此操作实测是可以的,完美解决

Nextcloud/ownCloud在URL中默认是显示入口文件index.php的:

去除URL中的入口文件有这样3点好处:

  • 拥有一个美观的URL
  • 防止入口文件被篡改,保护网站安全
  • 提高逼格

启用Rewrite

在Ubuntu/Debian中:

a2enmod rewrite #激活mod_rewrite

service apache2 restart #重启apache

在CentOS/RedHat中,需要手动在虚拟主机配置文件中添加以下内容:

LoadModule rewrite_module modules/mod_rewrite.so

然后重启Apache

service apache2 restart

无论方法1还是方法2,都是通过.htaccess中的Rewrite规则来实现的

方法1:config.php+OCC命令

编辑config/config.php

在config.php中设置规则,只需加入以下2行:

'overwrite.cli.url' => 'ownCloud/Nextcloud访问地址',
'htaccess.RewriteBase' => '/',

第一行一般已经存在,可以不再添加,如果和你当前的Nextcloud/ownCloud的访问地址不同,则要修改为当前地址。

以下是一个config.php示例的部分内容,需要添加或修改的两行已用黄色标出

  'overwrite.cli.url' => 'http://192.168.3.3', 
  'dbtype' => 'mysql',
  'version' => '12.0.0.16',
  'dbname' => 'nc',
  'dbhost' => 'localhost',
  'dbport' => '',
  'dbtableprefix' => 'oc_',
  'dbuser' => 'user',
  'dbpassword' => 'password',
  'installed' => true,
  'htaccess.RewriteBase' => '/',

现在可以将它保存了。

使用OCC命令生成.htaccess文件

别急着访问Nextcloud,我们只是添加了生成.htaccess的规则而已。现在要使用OCC命令重新生成.htaccess

OCC命令用法:【ownCloud】之终极管理:OCC命令行工具ownCloud/Nextcloud OCC命令行工具详解(1)

使用以下命令生成.htaccess文件:

Ubuntu/Debian类系统

sudo -u www-data php occ maintenance:update:htaccess

CentOS/RedHat:

sudo -u apache php occ maintenance:update:htaccess

如图:

访问你的Nextcloud,index.php已经消失了。

方法2:手动添加规则

打开Nextcloud/ownCloud根目录下的.htaccess文件,在文件最后插入以下内容:

ErrorDocument 403 /core/templates/403.php
ErrorDocument 404 /core/templates/404.php
<IfModule mod_rewrite.c>
  Options -MultiViews
  RewriteRule ^core/js/oc.js$ index.php [PT,E=PATH_INFO:$1]
  RewriteRule ^core/preview.png$ index.php [PT,E=PATH_INFO:$1]
  RewriteCond %{REQUEST_FILENAME} !\.(css|js|svg|gif|png|html|ttf|woff|ico|jpg|jpeg)$
  RewriteCond %{REQUEST_FILENAME} !core/img/favicon.ico$
  RewriteCond %{REQUEST_FILENAME} !/remote.php
  RewriteCond %{REQUEST_FILENAME} !/public.php
  RewriteCond %{REQUEST_FILENAME} !/cron.php
  RewriteCond %{REQUEST_FILENAME} !/core/ajax/update.php
  RewriteCond %{REQUEST_FILENAME} !/status.php
  RewriteCond %{REQUEST_FILENAME} !/ocs/v1.php
  RewriteCond %{REQUEST_FILENAME} !/ocs/v2.php
  RewriteCond %{REQUEST_FILENAME} !/robots.txt
  RewriteCond %{REQUEST_FILENAME} !/updater/
  RewriteCond %{REQUEST_FILENAME} !/ocs-provider/
  RewriteCond %{REQUEST_URI} !^/.well-known/acme-challenge/.*
  RewriteRule . index.php [PT,E=PATH_INFO:$1]
  RewriteBase /
  <IfModule mod_env.c>
    SetEnv front_controller_active true
    <IfModule mod_dir.c>
      DirectorySlash off
    </IfModule>
  </IfModule>
</IfModule>

保存退出,重新访问Nextcloud,效果与使用OCC命令一样。

一个完整的.htaccess文件:

<IfModule mod_headers.c>
  <IfModule mod_setenvif.c>
    <IfModule mod_fcgid.c>
       SetEnvIfNoCase ^Authorization$ "(.+)" XAUTHORIZATION=$1
       RequestHeader set XAuthorization %{XAUTHORIZATION}e env=XAUTHORIZATION
    </IfModule>
    <IfModule mod_proxy_fcgi.c>
       SetEnvIfNoCase Authorization "(.+)" HTTP_AUTHORIZATION=$1
    </IfModule>
  </IfModule>

  <IfModule mod_env.c>
    # Add security and privacy related headers
    Header set X-Content-Type-Options "nosniff"
    Header set X-XSS-Protection "1; mode=block"
    Header set X-Robots-Tag "none"
    Header set X-Download-Options "noopen"
    Header set X-Permitted-Cross-Domain-Policies "none"
    SetEnv modHeadersAvailable true
  </IfModule>

  # Add cache control for static resources
  <FilesMatch "\.(css|js|svg|gif)$">
    Header set Cache-Control "max-age=15778463"
  </FilesMatch>
  
  # Let browsers cache WOFF files for a week
  <FilesMatch "\.woff$">
    Header set Cache-Control "max-age=604800"
  </FilesMatch>
</IfModule>
<IfModule mod_php5.c>
  php_value upload_max_filesize 511M
  php_value post_max_size 511M
  php_value memory_limit 512M
  php_value mbstring.func_overload 0
  php_value always_populate_raw_post_data -1
  php_value default_charset 'UTF-8'
  php_value output_buffering 0
  <IfModule mod_env.c>
    SetEnv htaccessWorking true
  </IfModule>
</IfModule>
<IfModule mod_php7.c>
  php_value upload_max_filesize 511M
  php_value post_max_size 511M
  php_value memory_limit 512M
  php_value mbstring.func_overload 0
  php_value default_charset 'UTF-8'
  php_value output_buffering 0
  <IfModule mod_env.c>
    SetEnv htaccessWorking true
  </IfModule>
</IfModule>
<IfModule mod_rewrite.c>
  RewriteEngine on
  RewriteCond %{HTTP_USER_AGENT}  DavClnt
  RewriteRule ^$         /remote.php/webdav/          [L,R=302]
  RewriteRule .* - [env=HTTP_AUTHORIZATION:%{HTTP:Authorization}]
  RewriteRule ^\.well-known/host-meta /public.php?service=host-meta [QSA,L]
  RewriteRule ^\.well-known/host-meta\.json /public.php?service=host-meta-json [QSA,L]
  RewriteRule ^\.well-known/carddav /remote.php/dav/ [R=301,L]
  RewriteRule ^\.well-known/caldav /remote.php/dav/ [R=301,L]
  RewriteRule ^remote/(.*) remote.php [QSA,L]
  RewriteRule ^(?:build|tests|config|lib|3rdparty|templates)/.* - [R=404,L]
  RewriteCond %{REQUEST_URI} !^/.well-known/acme-challenge/.*
  RewriteRule ^(?:\.|autotest|occ|issue|indie|db_|console).* - [R=404,L]
</IfModule>
<IfModule mod_mime.c>
  AddType image/svg+xml svg svgz
  AddEncoding gzip svgz
</IfModule>
<IfModule mod_dir.c>
  DirectoryIndex index.php index.html
</IfModule>
AddDefaultCharset utf-8
Options -Indexes
<IfModule pagespeed_module>
  ModPagespeed Off
</IfModule>
#### DO NOT CHANGE ANYTHING ABOVE THIS LINE ####

ErrorDocument 403 /core/templates/403.php
ErrorDocument 404 /core/templates/404.php
<IfModule mod_rewrite.c>
  Options -MultiViews
  RewriteRule ^core/js/oc.js$ index.php [PT,E=PATH_INFO:$1]
  RewriteRule ^core/preview.png$ index.php [PT,E=PATH_INFO:$1]
  RewriteCond %{REQUEST_FILENAME} !\.(css|js|svg|gif|png|html|ttf|woff|ico|jpg|jpeg)$
  RewriteCond %{REQUEST_FILENAME} !core/img/favicon.ico$
  RewriteCond %{REQUEST_FILENAME} !/remote.php
  RewriteCond %{REQUEST_FILENAME} !/public.php
  RewriteCond %{REQUEST_FILENAME} !/cron.php
  RewriteCond %{REQUEST_FILENAME} !/core/ajax/update.php
  RewriteCond %{REQUEST_FILENAME} !/status.php
  RewriteCond %{REQUEST_FILENAME} !/ocs/v1.php
  RewriteCond %{REQUEST_FILENAME} !/ocs/v2.php
  RewriteCond %{REQUEST_FILENAME} !/robots.txt
  RewriteCond %{REQUEST_FILENAME} !/updater/
  RewriteCond %{REQUEST_FILENAME} !/ocs-provider/
  RewriteCond %{REQUEST_URI} !^/.well-known/acme-challenge/.*
  RewriteRule . index.php [PT,E=PATH_INFO:$1]
  RewriteBase /
  <IfModule mod_env.c>
    SetEnv front_controller_active true
    <IfModule mod_dir.c>
      DirectorySlash off
    </IfModule>
  </IfModule>
</IfModule>

附:NGINX的配置

NGINX和Apache的配置文件不同,所以在NGINX中,上面所述两种方法都是无效的。

NGINX的示例文件

以下是两种NGINX的配置示例,均来自官方文档。

当Nextcloud/ownCloud被安装于根目录时:

upstream php-handler {
    server 127.0.0.1:9000;
    #server unix:/var/run/php5-fpm.sock;
}

server {
    listen 80;
    server_name cloud.example.com;
    # enforce https
    return 301 https://$server_name$request_uri;
}

server {
    listen 443 ssl;
    server_name cloud.example.com;

    ssl_certificate /etc/ssl/nginx/cloud.example.com.crt;
    ssl_certificate_key /etc/ssl/nginx/cloud.example.com.key;

    # Add headers to serve security related headers
    # Before enabling Strict-Transport-Security headers please read into this
    # topic first.
    # add_header Strict-Transport-Security "max-age=15768000;
    # includeSubDomains; preload;";
    #
    # WARNING: Only add the preload option once you read about
    # the consequences in https://hstspreload.org/. This option
    # will add the domain to a hardcoded list that is shipped
    # in all major browsers and getting removed from this list
    # could take several months.
    add_header X-Content-Type-Options nosniff;
    add_header X-Frame-Options "SAMEORIGIN";
    add_header X-XSS-Protection "1; mode=block";
    add_header X-Robots-Tag none;
    add_header X-Download-Options noopen;
    add_header X-Permitted-Cross-Domain-Policies none;

    # Path to the root of your installation
    root /var/www/nextcloud/;

    location = /robots.txt {
        allow all;
        log_not_found off;
        access_log off;
    }

    # The following 2 rules are only needed for the user_webfinger app.
    # Uncomment it if you're planning to use this app.
    #rewrite ^/.well-known/host-meta /public.php?service=host-meta last;
    #rewrite ^/.well-known/host-meta.json /public.php?service=host-meta-json
    # last;

    location = /.well-known/carddav {
      return 301 $scheme://$host/remote.php/dav;
    }
    location = /.well-known/caldav {
      return 301 $scheme://$host/remote.php/dav;
    }

    # set max upload size
    client_max_body_size 512M;
    fastcgi_buffers 64 4K;

    # Disable gzip to avoid the removal of the ETag header
    gzip off;

    # Uncomment if your server is build with the ngx_pagespeed module
    # This module is currently not supported.
    #pagespeed off;

    error_page 403 /core/templates/403.php;
    error_page 404 /core/templates/404.php;

    location / {
        rewrite ^ /index.php$uri;
    }

    location ~ ^/(?:build|tests|config|lib|3rdparty|templates|data)/ {
        deny all;
    }
    location ~ ^/(?:\.|autotest|occ|issue|indie|db_|console) {
        deny all;
    }

    location ~ ^/(?:index|remote|public|cron|core/ajax/update|status|ocs/v[12]|updater/.+|ocs-provider/.+|core/templates/40[34])\.php(?:$|/) {
        fastcgi_split_path_info ^(.+\.php)(/.*)$;
        include fastcgi_params;
        fastcgi_param SCRIPT_FILENAME $document_root$fastcgi_script_name;
        fastcgi_param PATH_INFO $fastcgi_path_info;
        fastcgi_param HTTPS on;
        #Avoid sending the security headers twice
        fastcgi_param modHeadersAvailable true;
        fastcgi_param front_controller_active true;
        fastcgi_pass php-handler;
        fastcgi_intercept_errors on;
        fastcgi_request_buffering off;
    }

    location ~ ^/(?:updater|ocs-provider)(?:$|/) {
        try_files $uri/ =404;
        index index.php;
    }

    # Adding the cache control header for js and css files
    # Make sure it is BELOW the PHP block
    location ~* \.(?:css|js)$ {
        try_files $uri /index.php$uri$is_args$args;
        add_header Cache-Control "public, max-age=7200";
        # Add headers to serve security related headers (It is intended to
        # have those duplicated to the ones above)
        # Before enabling Strict-Transport-Security headers please read into
        # this topic first.
        # add_header Strict-Transport-Security "max-age=15768000;
        #  includeSubDomains; preload;";
        #
        # WARNING: Only add the preload option once you read about
        # the consequences in https://hstspreload.org/. This option
        # will add the domain to a hardcoded list that is shipped
        # in all major browsers and getting removed from this list
        # could take several months.
        add_header X-Content-Type-Options nosniff;
        add_header X-Frame-Options "SAMEORIGIN";
        add_header X-XSS-Protection "1; mode=block";
        add_header X-Robots-Tag none;
        add_header X-Download-Options noopen;
        add_header X-Permitted-Cross-Domain-Policies none;
        # Optional: Don't log access to assets
        access_log off;
    }

    location ~* \.(?:svg|gif|png|html|ttf|woff|ico|jpg|jpeg)$ {
        try_files $uri /index.php$uri$is_args$args;
        # Optional: Don't log access to other assets
        access_log off;
    }
}

当Nextcloud/ownCloud被安装于子目录时:

upstream php-handler {
    server 127.0.0.1:9000;
    #server unix:/var/run/php5-fpm.sock;
}

server {
    listen 80;
    server_name cloud.example.com;
    # enforce https
    return 301 https://$server_name$request_uri;
}

server {
    listen 443 ssl;
    server_name cloud.example.com;

    ssl_certificate /etc/ssl/nginx/cloud.example.com.crt;
    ssl_certificate_key /etc/ssl/nginx/cloud.example.com.key;

    # Add headers to serve security related headers
    # Before enabling Strict-Transport-Security headers please read into this
    # topic first.
    #add_header Strict-Transport-Security "max-age=15768000;
    # includeSubDomains; preload;";
    add_header X-Content-Type-Options nosniff;
    add_header X-Frame-Options "SAMEORIGIN";
    add_header X-XSS-Protection "1; mode=block";
    add_header X-Robots-Tag none;
    add_header X-Download-Options noopen;
    add_header X-Permitted-Cross-Domain-Policies none;

    # Path to the root of your installation
    root /var/www/;

    location = /robots.txt {
        allow all;
        log_not_found off;
        access_log off;
    }

    # The following 2 rules are only needed for the user_webfinger app.
    # Uncomment it if you're planning to use this app.
    # rewrite ^/.well-known/host-meta /nextcloud/public.php?service=host-meta
    # last;
    #rewrite ^/.well-known/host-meta.json
    # /nextcloud/public.php?service=host-meta-json last;

    location = /.well-known/carddav {
      return 301 $scheme://$host/nextcloud/remote.php/dav;
    }
    location = /.well-known/caldav {
      return 301 $scheme://$host/nextcloud/remote.php/dav;
    }

    location /.well-known/acme-challenge { }

    location ^~ /nextcloud {

        # set max upload size
        client_max_body_size 512M;
        fastcgi_buffers 64 4K;

        # Disable gzip to avoid the removal of the ETag header
        gzip off;

        # Uncomment if your server is build with the ngx_pagespeed module
        # This module is currently not supported.
        #pagespeed off;

        error_page 403 /nextcloud/core/templates/403.php;
        error_page 404 /nextcloud/core/templates/404.php;

        location /nextcloud {
            rewrite ^ /nextcloud/index.php$uri;
        }

        location ~ ^/nextcloud/(?:build|tests|config|lib|3rdparty|templates|data)/ {
            deny all;
        }
        location ~ ^/nextcloud/(?:\.|autotest|occ|issue|indie|db_|console) {
            deny all;
        }

        location ~ ^/nextcloud/(?:index|remote|public|cron|core/ajax/update|status|ocs/v[12]|updater/.+|ocs-provider/.+|core/templates/40[34])\.php(?:$|/) {
            fastcgi_split_path_info ^(.+\.php)(/.*)$;
            include fastcgi_params;
            fastcgi_param SCRIPT_FILENAME $document_root$fastcgi_script_name;
            fastcgi_param PATH_INFO $fastcgi_path_info;
            fastcgi_param HTTPS on;
            #Avoid sending the security headers twice
            fastcgi_param modHeadersAvailable true;
            fastcgi_param front_controller_active true;
            fastcgi_pass php-handler;
            fastcgi_intercept_errors on;
            fastcgi_request_buffering off;
        }

        location ~ ^/nextcloud/(?:updater|ocs-provider)(?:$|/) {
            try_files $uri/ =404;
            index index.php;
        }

        # Adding the cache control header for js and css files
        # Make sure it is BELOW the PHP block
        location ~* \.(?:css|js)$ {
            try_files $uri /nextcloud/index.php$uri$is_args$args;
            add_header Cache-Control "public, max-age=7200";
            # Add headers to serve security related headers  (It is intended
            # to have those duplicated to the ones above)
            # Before enabling Strict-Transport-Security headers please read
            # into this topic first.
            # add_header Strict-Transport-Security "max-age=15768000;
            # includeSubDomains; preload;";
            add_header X-Content-Type-Options nosniff;
            add_header X-Frame-Options "SAMEORIGIN";
            add_header X-XSS-Protection "1; mode=block";
            add_header X-Robots-Tag none;
            add_header X-Download-Options noopen;
            add_header X-Permitted-Cross-Domain-Policies none;
            # Optional: Don't log access to assets
            access_log off;
        }

        location ~* \.(?:svg|gif|png|html|ttf|woff|ico|jpg|jpeg)$ {
            try_files $uri /nextcloud/index.php$uri$is_args$args;
            # Optional: Don't log access to other assets
            access_log off;
        }
    }
}

Ubuntu nextcloud 视频缩略图视频封面生成

其实这个nextcloud程序视频缩略图有点麻烦,高了几天,也没搞明白,最终问题在哪里,应该是环境配置权限问题, 用宝塔和其他几个主流的LINUX面板套件,装了几次,系统也换了几次,程序能正常安装使用,就是视频缩略图不行,不知道是不是环境权限问题,能想到的,都给了, php-imagick 也安装,ffmpeg 也已经装了, 用 Preview generator 查件查看能正常生成视频缩略图,但是网页端就是加载,显示不了。

官方论坛资官料也找了,

config/config.php added

‘preview_libreoffice_path’ => ‘/etc/libreoffice’,
‘enable_previews’ => true,
‘enabledPreviewProviders’ =>
array (
0 => ‘OC\Preview\TXT’,
1 => ‘OC\Preview\MarkDown’,
2 => ‘OC\Preview\OpenDocument’,
3 => ‘OC\Preview\PDF’,
4 => ‘OC\Preview\MSOffice2003’,
5 => ‘OC\Preview\MSOfficeDoc’,
6 => ‘OC\Preview\PDF’,
7 => ‘OC\Preview\Image’,
8 => ‘OC\Preview\Photoshop’,
9 => ‘OC\Preview\TIFF’,
10 => ‘OC\Preview\SVG’,
11 => ‘OC\Preview\Font’,
12 => ‘OC\Preview\MP3’,
13 => ‘OC\Preview\Movie’,
14 => ‘OC\Preview\MKV’,
15 => ‘OC\Preview\MP4’,
16 => ‘OC\Preview\AVI’,
),

这里也添加了,PSD PDF 都能正常生成。

PHP-FPM env[PATH] 也已经添加

env[PATH] = /usr/local/bin:/usr/bin:/bin:/usr/local/PHP/bin:/usr/lib:/usr


WEB用户权限查了,也都没问题

sudo -u www /bin/sh
sh-5.1$ id
用户id=1001(www) 组id=1001(www) 组=1001(www)
sh-5.1$ type ffmpeg
ffmpeg 是 /usr/bin/ffmpeg
sh-5.1$ ffmpeg -version
ffmpeg version 4.3.4-0+deb11u1 Copyright (c) 2000-2021 the FFmpeg developers
built with gcc 10 (Debian 10.2.1-6)
configuration: –prefix=/usr –extra-version=0+deb11u1 –toolchain=hardened –libdir=/usr/lib/x86_64-linux-gnu –incdir=/usr/include/x86_64-linux-gnu

后来试了 官方的VM虚拟机的系统包,能正常生成缩略图,不是程序问题,也不是后面的配置问题,是宝塔,和其他LINUX面板的WEB环境套件的问题,具体哪里存在问题就不知道了。


用官方的VM虚拟机的套件,执行下面之后,然后,config.php 添加previews后,即可正常。

安装扩展:
sudo apt update
sudo apt-get install imagemagick-common
sudo apt-get install php-imagick
sudo apt-get install ffmpeg

还有阿里云里的配套的带NEXTCLOUD套件的系统,也按上面的操作即可。

折腾好几天,太郁闷了。