降低采样率和输出码率,共单片机语言播放设备使用,
PHP8.1版本 在conf目录里找到enable-php-81.conf 加入,
location ~ [^/]\.php(/|$)
{
try_files $uri =404;
fastcgi_pass unix:/tmp/php-cgi-81.sock;
fastcgi_index index.php;
include fastcgi.conf;
include pathinfo.conf;
fastcgi_param front_controller_active true;
}
nginx conf mine.types 加入
application/javascript mjs;
nginx 网站配置文件加入
location /.well-known {
rewrite ^/.well-known/webfinger /index.php/.well-known/webfinger last;
rewrite ^/.well-known/nodeinfo /index.php/.well-known/nodeinfo last;
rewrite ^/.well-known/(.*)$ /index.php/.well-known/$1 last;
}
# 处理 Nextcloud 的 ocm-provider 和 ocs-provider
location ^~ /ocm-provider/ {
try_files $uri $uri/ /index.php$request_uri;
}
location ^~ /ocs-provider/ {
try_files $uri $uri/ /index.php$request_uri;
}
#webdav和其他所有请求重定向到index.php上
location / {
rewrite ^ /index.php$uri;
rewrite ^/caldav(.*)$ /remote.php/caldav$1 redirect;
rewrite ^/carddav(.*)$ /remote.php/carddav$1 redirect;
rewrite ^/webdav(.*)$ /remote.php/webdav$1 redirect;
rewrite ^(/core/doc/[^\/]+/)$ $1/index.html;
}
#静态资源重定向
location ~* \.(?:png|html|ttf|ico|jpg|jpeg)$ {
try_files $uri /index.php$uri$is_args$args;
access_log off;
}
location ~ ^/(?:updater|ocs-provider)(?:$|/) {
try_files $uri/ =404;
index index.php;
}
#安全设置,禁止访问部分敏感内容
location ~ ^\/(?:build|tests|config|lib|3rdparty|templates|data)\/ {
deny all;
}
location ~ ^\/(?:\.|autotest|occ|issue|indie|db_|console) {
deny all;
}
location ~ ^/(data|config|\.ht|db_structure\.xml|README) {
deny all;
}
location ~ ^\/(?:updater|oc[ms]-provider)(?:$|\/) {
try_files $uri/ =404;
index index.php;
}
# Adding the cache control header for js, css and map files
# Make sure it is BELOW the PHP block
location ~ \.(?:css|js|woff2?|svg|gif|map)$ {
try_files $uri /index.php$request_uri;
add_header Cache-Control “public, max-age=15778463”;
add_header Referrer-Policy “no-referrer” always;
add_header X-Content-Type-Options “nosniff” always;
add_header X-Download-Options “noopen” always;
add_header X-Frame-Options “SAMEORIGIN” always;
add_header X-Permitted-Cross-Domain-Policies “none” always;
add_header X-Robots-Tag “none” always;
add_header X-XSS-Protection “1; mode=block” always;
# Optional: Don’t log access to assets
access_log off;
}
location ~ \.(?:png|html|ttf|ico|jpg|jpeg|bcmap|mp4|webm)$ {
try_files $uri /index.php$request_uri;
# Optional: Don’t log access to other assets
access_log off;
}
#mjs报错
location ~* \.mjs$ {
types { application/javascript mjs; }
try_files $uri =404;
}
# WASM
location ~* \.wasm$ {
types {
application/wasm wasm;
}
add_header Content-Type application/wasm;
expires 7d;
access_log off;
}
# otf
location ~* \.otf$ {
types {
application/x-font-otf otf;
font/opentype otf;
}
add_header Access-Control-Allow-Origin *;
expires 30d;
access_log off;
}
NGINX 配置 — Nextcloud 最新管理手册 最新文档
https://docs.nextcloud.com/server/32/admin_manual/installation/nginx.html
/www/server/nginx/confenable-php-74.conf 根据所使用php版本修改相对应文件 location ~ [^/]\.php(/|$)
{
try_files $uri =404;
fastcgi_pass unix:/tmp/php-cgi-74.sock;
fastcgi_index index.php;
include fastcgi.conf;
include pathinfo.conf;
}在配置文件最后一行加上fastcgi_param front_controller_active true;
    location ~ [^/]\.php(/|$)
    {
        try_files $uri =404;
        fastcgi_pass  unix:/tmp/php-cgi-74.sock;
        fastcgi_index index.php;
        include fastcgi.conf;
        include pathinfo.conf;
        fastcgi_param front_controller_active true;
    }
#(可选)添加如下header主要为了安全
add_header Strict-Transport-Security "max-age=63072000;";
#解析caldav和carddav
rewrite /.well-known/carddav /remote.php/dav permanent;
rewrite /.well-known/caldav /remote.php/dav permanent;
#静态资源重定向1
location ~* \/core\/(?:js\/oc\.js|preview\.png).*$ {
    rewrite ^ /index.php last;
}
#webdav和其他所有请求重定向到index.php上
location / {
    rewrite ^ /index.php$uri;
    rewrite ^/caldav(.*)$ /remote.php/caldav$1 redirect;
    rewrite ^/carddav(.*)$ /remote.php/carddav$1 redirect;
    rewrite ^/webdav(.*)$ /remote.php/webdav$1 redirect;
    rewrite ^(/core/doc/[^\/]+/)$ $1/index.html;
#静态资源重定向2,支持使用acme脚本在申请证书时对域名的验证
    if ($uri !~* (?:\.(?:css|js|svg|gif|png|html|ttf|woff)$|^\/(?:remote|public|cron|status|ocs\/v1|ocs\/v2)\.php|^\/\.well-known\/acme-challenge\/.*$)){
        rewrite ^ /index.php last;
    }
}
#静态资源重定向3
location ~* \.(?:png|html|ttf|ico|jpg|jpeg)$ {
    try_files $uri /index.php$uri$is_args$args;
    access_log off;
}
location ~ ^/(?:updater|ocs-provider)(?:$|/) {
    try_files $uri/ =404;
    index index.php;
}
#caldav和carddav
rewrite /.well-known/carddav /remote.php/dav permanent;
rewrite /.well-known/caldav /remote.php/dav permanent;
# Remove X-Powered-By, which is an information leak
fastcgi_hide_header X-Powered-By;

location = /robots.txt {
    allow all;
    log_not_found off;
    access_log off;
}
#(可选)为了支持user_webfinger app
rewrite ^/.well-known/host-meta /public.php?service=host-meta last;
rewrite ^/.well-known/host-meta.json /public.php?service=host-meta-json last;
#支持日历和联系人,建议加上
location = /.well-known/carddav {
  return 301 $scheme://$host:$server_port/remote.php/dav;
}
location = /.well-known/caldav {
  return 301 $scheme://$host:$server_port/remote.php/dav;
}
#启动Gzip,不要删除ETag headers
gzip on;
gzip_vary on;
gzip_comp_level 4;
gzip_min_length 256;
gzip_proxied expired no-cache no-store private no_last_modified no_etag auth;
gzip_types application/atom+xml application/javascript application/json application/ld+json application/manifest+json application/rss+xml application/vnd.geo+json application/vnd.ms-fontobject application/x-font-ttf application/x-web-app-manifest+json application/xhtml+xml application/xml font/opentype image/bmp image/svg+xml image/x-icon text/cache-manifest text/css text/plain text/vcard text/vnd.rim.location.xloc text/vtt text/x-component text/x-cross-domain-policy;
#安全设置,禁止访问部分敏感内容
location ~ ^\/(?:build|tests|config|lib|3rdparty|templates|data)\/ {
    deny all;
}
location ~ ^\/(?:\.|autotest|occ|issue|indie|db_|console) {
    deny all;
}
location ~ ^/(data|config|\.ht|db_structure\.xml|README) {
    deny all;
}
location ~ ^\/(?:updater|oc[ms]-provider)(?:$|\/) {
    try_files $uri/ =404;
    index index.php;
}
#这部分吧,默认就有,不过有所不同,所以我合并了下,替换原来的就行
location ~ ^\/(?:index|remote|public|cron|core\/ajax\/update|status|ocs\/v[12]|updater\/.+|oc[ms]-provider\/.+|.+\/richdocumentscode\/proxy)\.php(?:$|\/) {
    fastcgi_split_path_info ^(.+?\.php)(\/.*|)$;
    set $path_info $fastcgi_path_info;
    try_files $fastcgi_script_name =404;
    include fastcgi_params;
    fastcgi_param SCRIPT_FILENAME $document_root$fastcgi_script_name;
    fastcgi_param PATH_INFO $path_info;
    fastcgi_param HTTPS on;
    fastcgi_pass unix:/tmp/php-cgi-74.sock;
    # Avoid sending the security headers twice
    fastcgi_param modHeadersAvailable true;
    # Enable pretty urls
    fastcgi_param front_controller_active true;
    fastcgi_intercept_errors on;
    fastcgi_request_buffering off;
}
# Adding the cache control header for js, css and map files
# Make sure it is BELOW the PHP block
location ~ \.(?:css|js|woff2?|svg|gif|map)$ {
    try_files $uri /index.php$request_uri;
    add_header Cache-Control "public, max-age=15778463";
    add_header Referrer-Policy "no-referrer" always;
    add_header X-Content-Type-Options "nosniff" always;
    add_header X-Download-Options "noopen" always;
    add_header X-Frame-Options "SAMEORIGIN" always;
    add_header X-Permitted-Cross-Domain-Policies "none" always;
    add_header X-Robots-Tag "none" always;
    add_header X-XSS-Protection "1; mode=block" always;
    # Optional: Don't log access to assets
    access_log off;
}
location ~ \.(?:png|html|ttf|ico|jpg|jpeg|bcmap|mp4|webm)$ {
    try_files $uri /index.php$request_uri;
    # Optional: Don't log access to other assets
    access_log off;
}wget -N --no-check-certificate https://raw.githubusercontent.com/FunctionClub/v2_ray.fun/master/install.sh && bash install.sh
安装过程输入 账号 – 密码 – 端口号 即可,访问面板通过 ip+port,更改面板配置信息,直接ssh连上去命令行界面输入 v2_ray。
访问v2面板:
修改任意端口及websocket协议,修改传输协议为 WebSocket 时会提示输入域名,输入添加解析的域名 v2_ray.xxx.com。
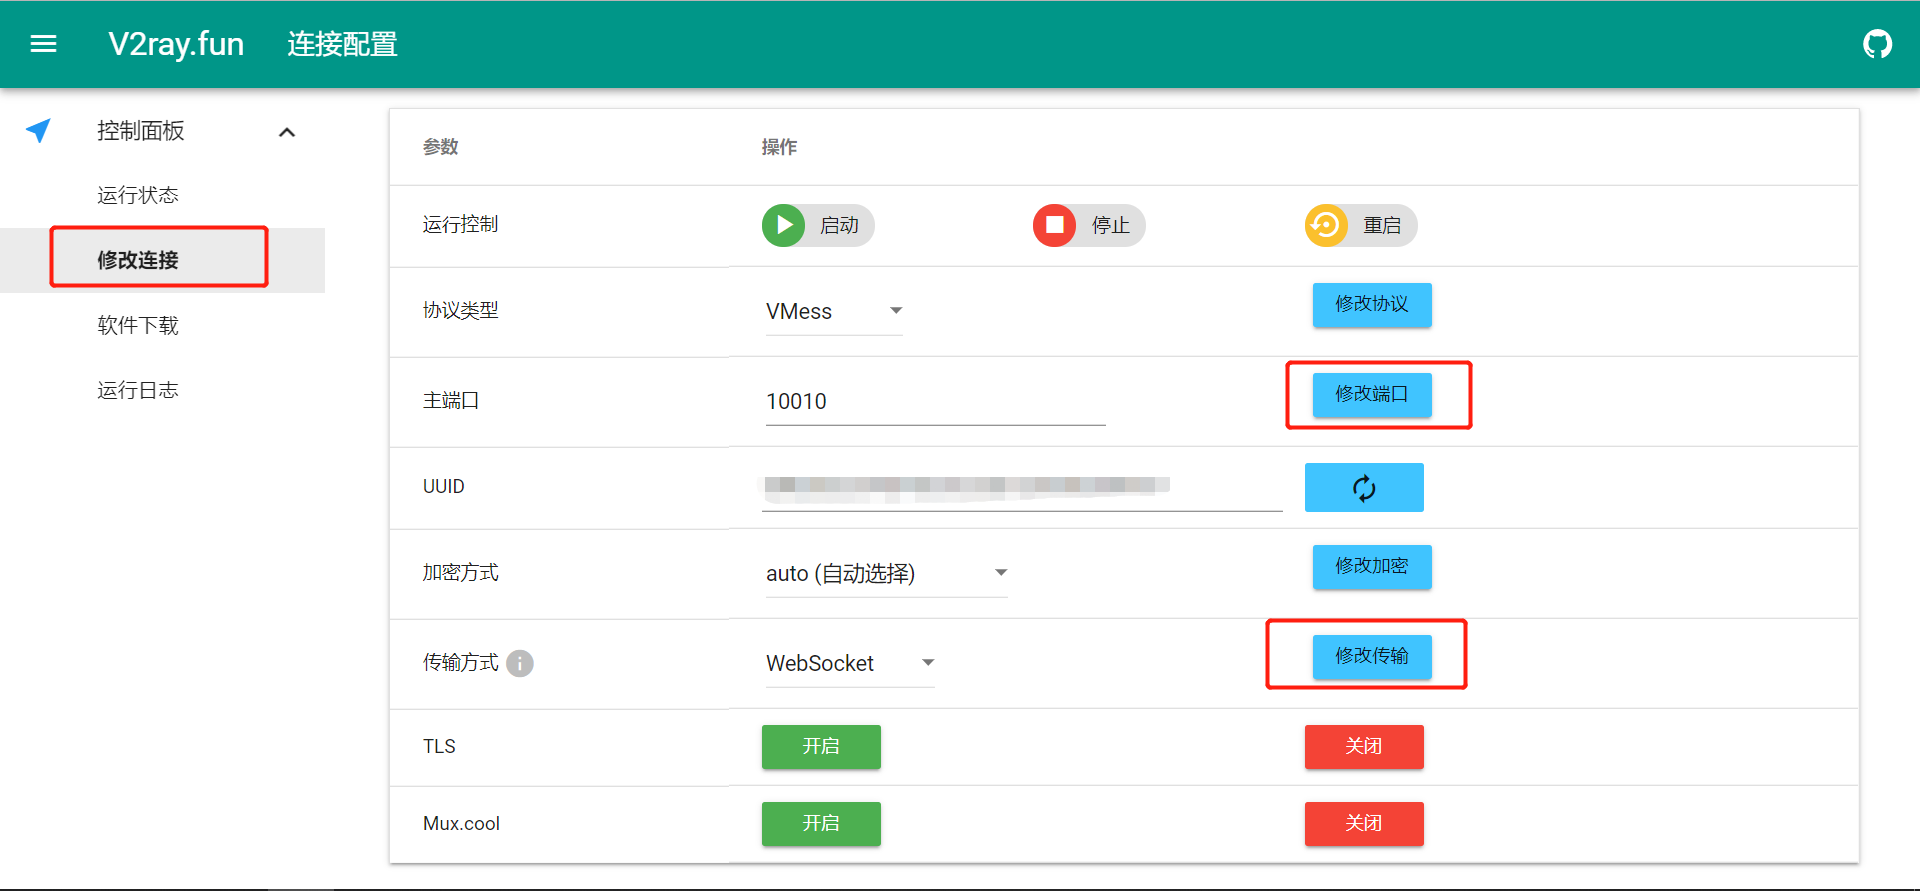
再编辑 /etc/v2_ray/config.json 文件,指定 path路径 /ws/

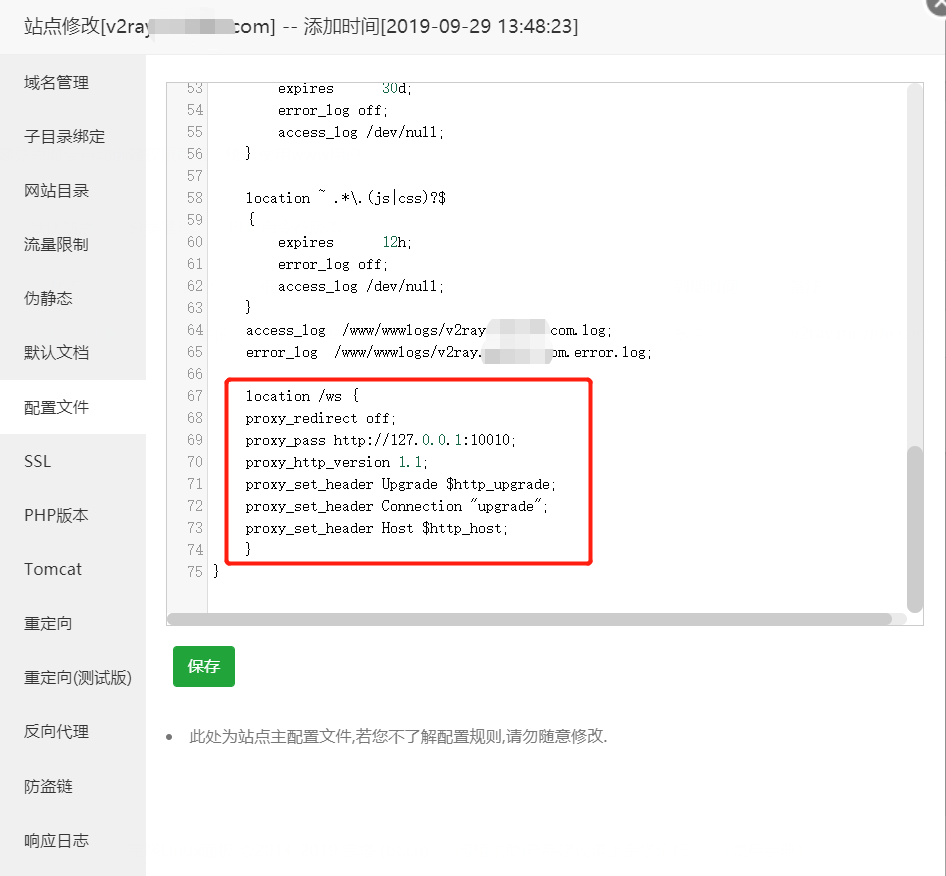
在网站配置文件或nginx的配置文件中添加:
location /ws {
proxy_redirect off;
proxy_pass http://127.0.0.1:10010;
proxy_http_version 1.1;
proxy_set_header Upgrade $http_upgrade;
proxy_set_header Connection "upgrade";
proxy_set_header Host $http_host;
}
重启nginx和v2_ray服务
nginx可通过可视化界面点击重启;
service v2_ray restart
步骤 1: 下载安装脚本
首先,使用 wget 命令下载 frps-onekey 安装脚本:
wget https://raw.githubusercontent.com/mvscode/frps-onekey/master/install-frps.sh -O /install-frps.sh
步骤 2: 赋予脚本执行权限
下载完成后,赋予脚本执行权限:
chmod 700 /install-frps.sh
步骤 3: 运行安装脚本
运行安装脚本以开始安装 Frp 服务端:
./install-frps.sh install
步骤 4: 配置 Frp 服务端
安装过程中,脚本会提示你输入一些配置信息,如监听端口、Token 等。根据提示输入相应的配置信息。
步骤 5: 启动 Frp 服务端
安装完成后,Frp 服务端会自动启动。你可以使用以下命令管理 Frp 服务端:
/etc/init.d/frps [start|stop|restart|status|config|version]
其他操作
卸载 Frp 服务端:
./install-frps.sh uninstall
更新 Frp 服务端:
./install-frps.sh update
通过以上步骤,你可以轻松地在服务器上安装和配置 Frp 服务端,实现内网穿透功能。
————————————————
frps-onekeyFrps 一键安装脚本&管理脚本 项目地址: https://gitcode.com/gh_mirrors/fr/frps-onekey
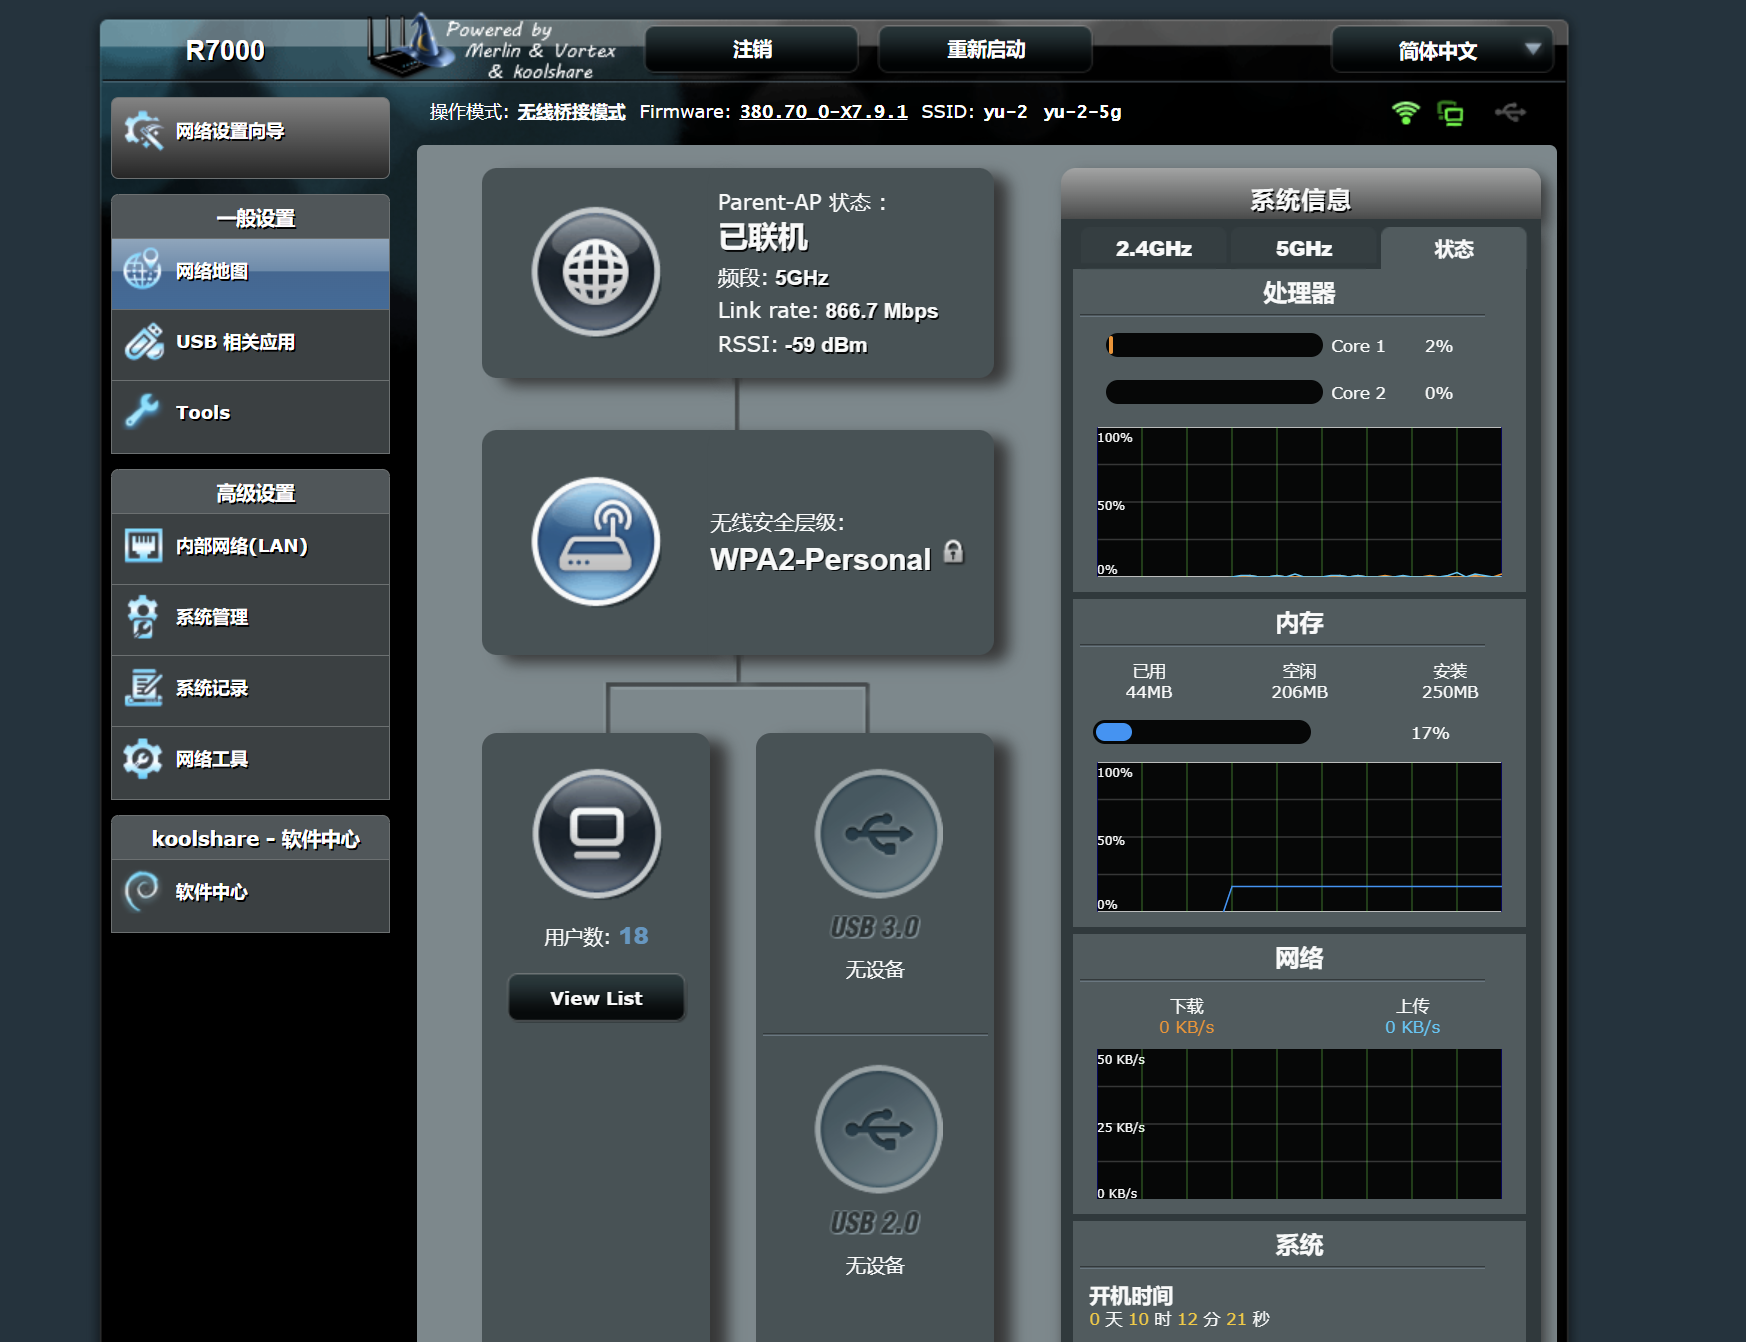
应该已经淘汰了的路由器,二手就30块钱,不过普通家用其实还是性能过剩,宽带也跑不了那么多,局域网1000M也完全够用的。原版的固件不怎么好用,直接刷梅林,还能再战几年吧。
消费降级的时代,能用就用。
固件保存地址:https://yun.wyrj.com/index.php/s/9jEFDoXCXHdkDez
bash <(curl -Ss https://my-netdata.io/kickstart-static64.sh)
或者
sudo apt-get install netdata
访问:http://<your-server-ip>:19999
开始安装没有启动,或者只能本地访问,需要更改配置文件,/etc/netdata/netdata.conf 127.0.0.1 的地址改成,0.0.0.0
NetData的基本操作
# 启动NetData服务,并设置开机启动
sudo systemctl enable netdata
sudo systemctl start netdata
# 重启服务
sudo systemctl restart netdata
# 停止NetData服务
sudo systemctl stop netdata
fstab全称为file system table,即文件系统表。它在开机的时候告诉系统挂载哪些分区、挂载点是什么、以什么格式挂载、挂载的选项等等。系统在开机的时候会根据fstab内容,执行挂载操作。
UUID=your UUID /data ext4 defaults 0 2或
/dev/nvme0n1 /data ext4 defaults 0 0 第一列可以是实际分区名,也可以是实际分区的uuid,如果磁盘是SATA(Serial Advanced Technology Attachment)接口,且有多个磁盘,则每个磁盘被标记为 /dev/hda 、 /dev/hdb、 /dev/hdc 等以此类推;而每个磁盘的分区被标记为 /dev/hda1、 /dev/hda2等。
如果磁盘是SCSI(Small Computer System Interface,小型计算机系统接口)类型,则多个磁盘会被分别标记为 /dev/sda、/dev/sdb等等。
我的是nvme磁盘, 是 Non-Volatile Memory Express 的缩写,意思是非易失性内存快速通道。
第二列为磁盘分区的挂载目录,可以通过df -TH命令查询。挂载点必须为当前已经存在的目录,为了兼容起见,最好在创建需要挂载的目标目录后,将其权限设置为777,以开放所有权限。
第三列为磁盘分区的文件系统格式, 可以通过df -TH命令查询。
第四列为磁盘分区的挂载选项,此处通常设置为defaults即可。
第五列为Linux dump备份选项。
0表示不使用Linux dump备份。现在通常不使用dump备份,此处设置为0即可。
1表示使用Linux dump备份。
第六列为fsck选项,即开机时是否使用fsck检查磁盘。
0表示不检验。
挂载点为(/)根目录的分区,此处必须填写1。
根分区设置为1,其他分区只能从2开始
使用操作系统 cron 功能是执行 常规任务。此方法允许在没有 Web 服务器可能具有的固有限制。
在 *nix 系统上每 5 分钟在默认 Web 下运行 cron 作业 服务器用户(通常是 或 ),您必须设置以下内容 cron 作业调用 cron.php 脚本:www-datawwwrun
# crontab -u www-data -e
*/5  *  *  *  * php -f /var/www/nextcloud/cron.php
您可以通过执行以下命令来验证是否已添加和调度 cron 作业:
# crontab -u www-data -l
*/5  *  *  *  * php -f /var/www/nextcloud/cron.php
注意
您必须将路径替换为 路径添加到您当前的 Nextcloud 安装中。/var/www/nextcloud/cron.php
注意
在某些系统上,可能需要调用 php-cli 而不是 php。
注意
请参阅 crontab 手册页了解确切的命令语法。
如果系统上安装了 systemd,则 systemd 计时器可以是 cronjob 的替代方案。
此方法需要两个文件:nextcloudcron.service 和 nextcloudcron.timer。在 中创建这两个文件。/etc/systemd/system/
nextcloudcron.service 应如下所示:
[Unit]
Description=Nextcloud cron.php job

[Service]
User=www-data
ExecStart=/usr/bin/php -f /var/www/nextcloud/cron.php
将 user 替换为 http 服务器的用户以及 nextcloud 目录中的 cron.php 的位置。www-data/var/www/nextcloud/cron.php
请注意,.service unit 文件不需要节。请检查您的设置,因为我们在本管理员手册的早期版本中推荐了它。[Install]
nextcloudcron.timer 应如下所示:
[Unit]
Description=Run Nextcloud cron.php every 5 minutes

[Timer]
OnBootSec=5min
OnUnitActiveSec=5min
Unit=nextcloudcron.service

[Install]
WantedBy=timers.target
定时器单元中的重要部分是 和 。 将在启动后 5 分钟启动计时器,否则您必须在每次启动后手动启动它。 将在上次激活服务单元后设置 5 分钟计时器。OnBootSecOnUnitActiveSecOnBootSecOnUnitActiveSec
现在剩下的就是通过运行以下命令来启动并启用计时器:
systemctl enable --now nextcloudcron.timer
当此选项与 一起使用时,相应的单元也将启动。--nowenable
注意
在后台作业的管理菜单中选择该选项不是必需的,因为一旦从命令行或 cron 服务执行cron.php,它就会自动将其设置为 。CronCron